Thursday, October 18, 2012

Pumpkins...


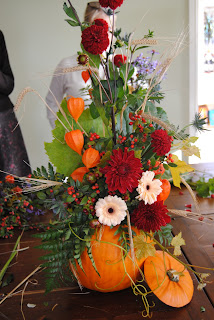
Today's flower arrangement, seeing what I could
do with a bunch of Tesco's flowers and what was
in the garden.
Well, after yesterday, pumpkins are no longer the good ol' jack o' lantern in our house, although I am being pushed to create this weekend!

A pumpkin is now a vase for Halloween and harvest flowers. The innards are pumpkin and chilli bread and pumpkin cake and pumpkin pie (recipes below)! Oh and the chickens had the seeds - although I have been known to roast those with salt in the past, but it is rather like eating cardboard, however good they might be for you.

So sharing some recipes today so that you have things to do with the middle of your pumpkins!

Pumpkin and Chilli Bread:

  • 120floz warm water with one tablespoon of good quality yeast (leave to activate for around 20 mins before using)
  • Around 6oz of pureed pumpkin (I just let mine soften with a little water in a pan, then puree with my hand blender)
  • 9oz wholemeal bread flour
  • 9oz white bread flour
  • tsp of salt
  • 1 chilli chopped finely and de-seeded.
  • oil for your bowl for proving and for the baking tray.
  • spray mister with water in.

So, my bread has never been the biggest success in my life, but that is probably because I am impatient with it. It needs time to rise and be kneaded and prove again before you even entertain the idea of showing it the oven. The oven also needs to be hot around 200c and the bread (according to the lovely Mr Hollywood) is better wet on the outside - hence the spray mister (you can alternatively mist your oven throughout the cooking process)

So let's see:

Your yeast needs to activate.
Whilst you're waiting, weigh out your flours and put them into a bowl with the salt and the chopped chilli.
Just before your start to blend it altogether, put the pumpkin into the bowl and gradually add the warm water/activated yeast mix.

Now, the more you knead, the better your bread.
This is not a quick bread to do, it will take at least 3-4 hours with rising times.

Knead it altogether, knock it out onto a floured work surface and knead until it becomes elastic. This can be 20 plus minutes of anger management therapy and is MUCH cheaper!

You'll also find that the better kneaded it is, the shinier the surface of the bread becomes (obv. using wholemeal there will still be a little grainy effect)

Put oil in your bowl, then put your bread mix back into it, cover with a clean tea towel and leave it to stand for at least an hour or until it's doubled in size. Now, it may be quicker than that, mine rose fast this morning because I left it on the back of the stove whilst the oven was on, so it was warm.

You will need to knock it out again after the first rise.
Then put it back in the bowl and leave for it to rise again.

On the second turn out, put it onto your oiled baking tray, mist well with water and pop in your hot oven for around 20 - 30mins.

To check the bread is done properly, take it out with your oven gloves, turn it upside down and knock on the bottom, if it sounds hollow, it is done.


Pumpkin Spice cake:

This is a victoria sponge style version with lemon butter cream

  • 8oz self raising flour
  • 1tsp baking powder
  • 1tsp ginger and 1tsp cinnamon
  • 10oz dark muscovado sugar
  • 6oz pureed pumpkin
  • 2 large duck eggs (they are ultimately the dog's wotsits for baking over chickens- sorry girls!)
  • 125mls rapeseed or vegetable oil + oil for the parchment that lines your tin
  • around a 8inch rectangular tray-bake tin lined with parchment and then oiled.
  • oven to 180c
So, put your eggs and sugar in your mixer or if you're doing by hand, the bowl and beat until the colour changes slightly. This is SO important, it makes the difference between something you can fill your walls with and something light and fluffy to show the WI* what you're made of!, add the oil and the pumpkin and slowly mix in.

Now add your flour and baking powder by SIFTING it - again, high sifting introduces air to your mix, which gives you a lovely sponge rather than a dense brick! Add the spices and fold them in gently.

The batter is a runny batter, so don't freak out (I did!)

Pour it into your lined, oiled tin and put in the oven for around 18 - 20 mins.

Test it in the middle with a knife to see if it comes out clean.

It's lovely as is, or with custard - it's that kind of sponge, OR...

Lemon cream cheese topping:

Oh yes, guys and gals - let's send the waistline on holiday and do this in style!
You'll need:
  • Cream cheese 250mls (plain - don't go buying the stuff with chives in - it ain't pleasant!)
  • Icing sugar
  • 2 lemons juiced and zested
Put the cream cheese and lemons and zest into a bowl and stir well, gradually add sifted icing sugar.
You'll note I haven't put an amount because this is where your tasting capabilities come in!
Some cheeses are stronger than others, so you'll require more sugar or lemon. Some lemons are bigger than others, so you'll require more sugar.
You want enough so you have a tart, kick-you-in-the-pants flavour without any one thing being overpowering. So that is why you add, you taste, add some more, taste some more...you get my drift!


This is the tray bake version without the lemon cheese topping


 Pumpkin Pie 

Now, before I start, let me just tell you, Pumpkin Pie is NOT the national dish of the USA. Apple pie is! So, despite the fact that our US friends can do everything walking with pumpkins, it still has not claimed the top spot as the national dish -ha! So there you go, you don't need anything except my blog to help you win that pub quiz!
You need:
  • Pumpkin middle - cubed
  • Sugar - molasses if you like the flavour, or dark brown or muscovado, around 6oz
  • 1 tsp salt
  • 6oz butter
  • 1tsp cinnamon
  • 1/2 tsp ginger
  • Pastry or pie base

Okay, so you're gonna need to make up some pumpkin puree again. Of course, you can buy pumpkin puree or pie mix in the shops these days, but this blog entry was trying to help you use up the insides of all those jack o' lanterns, so you are going to make yours!

Put your pumpkin cubed into a heavy duty saucepan with some dark molasses sugar - this is quite strong, so if you prefer to use dark brown or even light muscovado, it's up to you.
Let it really gently simmer for around half and hour to 45 mins, it takes a while to soften some of the pumpkin up. Once it's softened, let it cool, then puree.

Now add the 6oz of butter, the cinnamon and the ginger and stir until the butter is melted. You don't need to boil it.

Using either a pastry dish, your own pastry or shop bought, roll out and bake the pie base.

I use shop bought - I know, I confess, I am no good with pastry - I think because I have hot hands ;-)
I put pie weights in over my greaseproof paper and then bake on 180 for around 10 - 12 mins, it won't take long because my base is generally quite thin.

Once your base is out allow it to cool a little, don't let the  pumpkin/butter mix cool completely otherwise it'll set.

Pour the mix into the base and put in the fridge to cool.

It 'should' set!

You can then either eat as is, or you can do what I'm going to do and add meringue on the top to make pumpkin meringue pie! I'll add the rest of the recipe and the pictures later as mine is currently setting in the fridge!

Enjoy!

* I realise that I mentioned the WI in a competitive way in my last post, you may be wondering if I have some thing against them, the answer is, 'no, I just lack imagination!'. 


Wednesday, October 17, 2012

Flower arranging

With luck and some trepidation I am returning to work. I think I have managed to secure a Montessori teaching job and will be returning after half term. With this in mind, I have decided that the final two weeks of the children being off school will be spent doing as many of the things I love doing as possible and learning new things too. So, with a glorious autumnal morning under my belt, I drove over to Bay Tree Cottage for a morning of Halloween and Harvest flower arranging (or floristry). 
I have NEVER, repeat, NEVER done this before and, to be honest, I think it moves me into serious WI or Margo Leadbetter categories than good old Barbara and her wellies (that's where I like to think I am anyway!) 
I was a touch nervous about going. My history of flowers and arranging is firmly embedded in the ... you buy a bunch and they're arranged in the packet, so if you're careful, you can lift them out and dump them in a vase as is and the original arrangement is barely disturbed (such a heathen!)

How wrong was I? 
Not a Margo, not even a Stepford Wife in sight (phew!) and, although I left my wellies by my back door, I wouldn't have been out of place wearing them!

This is Janet

 Janet is a florist

 She does fantastic things with flowers and pumpkins (actually any receptacle really!)

 She's rather good isn't she? This is my note taking by the way. I didn't write a thing - why would you 'write' about the flowers...all the notes you need are in the beauty of the arrangement!


This is the finished piece - isn't is wow! Look at all those colours and textures. The whole intensity of the piece, blows me away.

Okay, so the picture on the right is my starting pile!

and our pumpkins...


Starting off....
Noticing the bits that got missed!
Tweaking


  Ta Da!

So it's not quite as good as Janet's but I am thrilled with it and am going to shop for more pumpkins and other things tonight so I can make another one tomorrow!

This was all the group's efforts up for their photo shoot. I'm back left as you look at it.

Aren't they fantastic?

It was a great day, really worth the money as you'd not buy this arrangement in the shops for the course fee and now I have a skill I can reuse with a bit of oasis and some floristry wire, I will NEVER buy and dump again! Ever!


Sunday, October 07, 2012

Simple Bramble and Apple Jelly


What you will need:

Fruit - the more the better for jelly
A Maslin pan or similar large, heavy duty, flat bottomed pan
Clean and sterile jam jars or kilner jars with new seals.
Muslin cloth
A hook or someway of securing a hanging parcel of wet drippy fruit to drip into a bowl
A big bowl
String
Sugar - granulated or jam sugar (which has added pectin)
Possibly some liquid pectin
Patience.

What to do:

Cooking part I

  • Collect your fruit
  • Wash the fruit - you don’t need to be picky about taking out the stems or peeling (if you use apple too - blackberry and apple jelly is even easier as it sets so well because apples have lots of pectin in) 
  • Chuck it in a pan WITHOUT sugar at this point (this is where jam and jelly differ - if you use sugar at this point, you’ll set your jam and it won’t strain)
  • You ‘may’ need to add some water, but see how much juice comes from your berries as you gently simmer and soften them.
  • Once they’re mushy (see, not an exact science), you need to strain.

Straining

This is where a muslin cloth comes in handy - ALL mamas have muslin cloths lying around - obviously make sure it’s not a baby puke one and it’s clean wink
I use a big bowl underneath and then use a sieve to get me started.
  • Lie the muslin over the sieve and gently load in your fruit - if you have someone to help you it might be easier.
  • Once you have your fruit in the muslin you need to tie it like a Dick Whittington sack with string. Then hang it over the bowl and you can remove the sieve. There are contraptions you can buy on the market to do this, alternatively if you don’t want to put a hook in somewhere, I use the cupboard handle over my counter top - the Women’s Institute it ain’t lol!
  • Leave it to drip through for 24 hours.

This is the bit where I do often get a little disheartened as when I come down the next morning there never seems to be as much juice as I’d like for jelly, but there’s the rub. We make cider and from 20lbs of apples you can likely get around only 10pints of juice, so there’s a lot of fruit mush left over too and not so much on the juice front. Still - it’s a nice change to jam sometimes.
Right,

Cooking part II

  • Get your juice back in your pan and you need to add around the same quantity of sugar as you have juice 
  • Let it gently come to the boil, stirring continuously until the sugar has dissolved so it doesn’t crystalise. 
You can, by the way, get sugar with added pectin in it so if you want to be sure it sets, alternatively you can buy liquid pectin which I sometime just pop a quick shot in to ensure setting.
  • Let it boil gently for around half an hour - ish - you need to take the plunge here and play it by ear unless you want to go down the route of thermometers - but to me, it takes the fun out of messing about with jam making and makes it really prescriptive.
  • To test whether it’s ready you need a cold plate and a tea spoon. take a small amount out and put it on the plate, tip the plate sideways. If the jelly doesn’t budge cos it sets - then the job’s a good ‘un. If it still runs, you need to continue boiling a little longer.

Get your sterilised  jars. I sterilise mine in the dishwasher, but there are many other ways of doing it.

Now, this bit IS important - I learned the hard way.
  • Because you HAVE to put the jelly in when it is hot, otherwise it’ll set in your pan, you need to put your sterilised jars onto a tray and put them into the oven for a few minutes to warm up. This will ensure they won’t crack when you pour in the jelly.
  • Put your lids on and tighten.
It’ll then cool and set.
So, a little more laborious, but delicious for a change to jam. You can then get really clever and start doing stuff like mint jellies.  Have fun and don’t worry too much - it’s only the die hards that have made it seem so difficult. xx


* Please note that I DO NOT follow recipes and my ideas are not prescriptive, they are trial and error. The idea behind these recipes is so people can enjoy in the simplicity of making their own rather than being scared by the fear of cooking. Please take care when cooking - if you burn yourself because you are a berk and don't wear oven gloves for example, it is not my fault, it is because you are a berk and probably shouldn't be allowed in a kitchen, let alone be allowed to cook. Just be sensible!

Cider making

One of the great things about growing your own is...well, frankly...eating your own and turning your own into something particularly yummy.

Throughout the year we've happily made chutney and jams and jellies, however, our huge supply of apples this year had us a little stumped for over wintering until I had a brainwave for Mr Beehive's early birthday present...

A cider press!


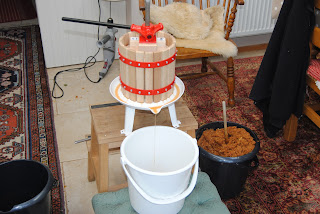
It's a little gem that will squeeze the juice out of our apples so we can either store it as the most delicious juice we've ever tasted, or...better still...cider.

So Mr Beehive has doned his lumberjack shirt, not trimmed his beard and embraced the local knowledge in a neighbouring village as to the skills required to make 'zyder'. He quickly came to the conclusion, having noted the swift and happy consumption of last year's cider, commencing at 10am in the morning, that you're likely be pretty hammered whilst making cider, thus it can't be 'that hard' a task.

Having presented the 'apple day gang' with 20lbs of our own apples for a nominal fee (which probably would have been waived as the day progressed and the cider flowed), we came back home with 6 gallons of juice!

So he has spent much of the weekend turning my kitchen into a scrumping and scratting zone. We now have 3 demi johns fermenting away for next spring and a gallon and a half of juice, half is in the freezer and quarter in the fridge and the remaining quarter...well, let's just say, I always choose the job of 'quality control' I swear it's a freakin' steal!

As one of the jolly cider gang said - it's always a nice day on cider making day and belive you and me...it's been beautifully sunny. Let's hope next year yields a good quality 'Thornhill Scrumpy'.


Start with your chopped apples


Use your Black and Decker Drill to scrat the apples!
Scratting! Creates a pulp that makes the press happy!


Juicing the scratted apples and in the bucket on the left is the remaining Pomace.


Pomace leftover skin
Cider in the making - yeast to go in two and one we're experimenting to see if our apples are good for natural yeast. 


As for the rest of the weekend;

I have been on an adventure of my own up to Leicester to discover The Fabric Guild - say no more.
Master Beehive the elder and I went to Chippy to the Autumn fayre and learned how to weave...and bought a small loom...say even less
Then we went to A & E as Master Beehive hurt his finger playing in goal on Thursday and it got progressively more swollen over Friday, so by Saturday afternoon we decided to just get it checked out. I didn't think it was broken due to the fact he could move it, but a hairline fracture could have been on the cards. So, four hours later *yawn* and we went home with the same bruised finger as we went in with but my conscience duly clear.
Finally the Little Miss wanted to go to Canal Day, so we took a swift visit there over lunchtime today.
Now we could do with a weekend to recover lol! I love weekends like this!


Monday, October 01, 2012

Vegan recipes and eczema

This post probably should be linked to my other blog : At Home With Montessori as it is connected, however, Mr Beehive has been in Munich since Friday morning at 4am so I'm slightly tired this evening having done all the week, plus the weekend and he's off again tomorrow to Budapest. So forgive me that you need to join the dots yourself tonight!

So, Master Beehive the elder has had terrible flare ups of his eczema which came back with somewhat of a vengence last September.
Initiallly we thought it was cold, then in the summer, heat; perhaps it was mould induced from the poor quality windows in his room, but having them replaced hasn't changed things; perhaps it was stress from starting a new school, but he's been just as itchy this year and he's now in year 8. Then my mum put me onto a programme about a little boy who had eczema who reacted well when dairy (cow's milk in particular) was taken out of his diet.

We have tried different combinations of emolients, different steroids, hydrocortisone, wearing gloves, he has cotton clothing from the eczema society, we change his sheets every week.
Obviously our health is affected by what we put in our bodies and, whilst he has a very healthy diet, there may be something within in it that is causing him to itch. Then the cycle returns: the inducer takes hold and causes adrenalin and histamine to release, this causes him to itch, he then scratches and his body will then release more histamine...it's one of the most helpless vicious circles to observe from the outside. I cannot begin to understand how painful it is for him when his skin cracks open and weeps.

So we thought we'd try this. He has been dairy free now for around three weeks but he obviously misses some of his favourite foods, so I have a couple of recipes below for a vegan lasagne and a vegan curry.

Interestingly, however, I was reading about the four planes of development and how Montessori likened the 12 - 15 years to the 0 - 3 year period. She talks about the tantrums that a 3 year old may throw because they are, as yet, unable to communicate sufficiently to express their desire, is similar to the tantrums a teen may throw because their bodies are changing and they don't know what is going on or how to express the weird feelings - the angst of friendships, puberty, feelings towards someone they're attracted too perhaps...

She goes on to say that children in both these periods are more vulnerable to diseases or conditions that they have experienced before can recur. When thinking about it, it's true: babies are more susceptible to things like Meningitis and so are teens. Glandular fever is more likely to occur in the teenage years etc.

When MB the elder was a baby, his eczema was terrible. He would scratch himself raw and we thought he had an egg allergy, he would come up with hives when he ate egg, even if I put the shell on his skin. I'm pretty positive this is not a recurrence of his egg allergy, but maybe he also had a dairy intolerance as a baby and we were unaware? So, we are eliminating for now, then we may introduce some goat cheese or milk and see what happens. If we see no change then we'll be off to the allergy clinic as our next port of call.

So whilst we have been dairy free it's opened my eyes to what exactly is in food and how hard it is for children, especially those on a dairy free diet, to enjoy a fulfilled and healthy diet. It is actually so SIMPLE to alter things slightly so that kids can enjoy the same foods as they did before, but with a slight twist and that doesn't mean buying soya products or artificial cheese mixes.

We have discovered that Rice Milk makes a fine substitute for regular milk in a white sauce for lasagne or other dishes.

  • Some Rice Milks are nicer than others.
  • Almond milk is tasty, but high in sugar!
  • Coconut milk with chocolate from Tesco is a lovely rich treat, with this you can make chocolate pudding or banana custard!
  • Creamy sauces for kormas can come from coconut cream.
  • Butters can be substituted for Marg, veg. oil (in cakes) or coconut oil (in curries)
  • Our local farm shop makes dairy free chocolate cakes, treacle tarts and vegan blueberry slices.
  • If you're making porridge, use rice milk for a thicker result than water but CHECK THE LABELS, some porridge oats, particularly the individual packet ones, have milk powder in them.
  • Making your own bread in a bread maker, or by hand, is a better, if not cheaper option than shop bought. If it is white bread and doesn't have a label on it and there's no one to ask, presume there will be milk powder in it. We had a horrid reaction last week to some bread.
  • Sweet treats are not impossible - if you have a good farm shop, check them out, alternatively substitute butters and fat for oil or applesauce.
  • And just because I found this out today...anyone with an egg allergy or vegan (and over 18) - egg whites or fish bladder are often used as isinglass finites particularly in casked real ales and some red and white wines! Hmmm, I wonder how many bearded CAMRA veggies are still tipping real ales down their throats?


MB the elder's school is fairly useless with its variety for kids with special diets other than vegetarian, so I'm going to see the catering manager on Friday as his dinner today consisted of rice, nan bread and potatoes (WTF!) as the veggie option was three cheese pasta and the meat option was chicken korma with butter and cream in it! We have informed them of his diet, so I am hoping they may start to put something in place, even if it is steamed veggies or some salad options.

Anyway, here's my vegan lasagne

Vegan Lasagne with Herby sauce


In a large pan gently melt some olive oil,
Fry onion and garlic.
Add all your veggies that you want and allow them to slightly brown
Add your tin of tomatoes
I also add some of Sainsbury's kidney beans in chilli sauce because it helps to thicken and gives it a kick.

Once the veggies are softer, put them into your lasagne dish.

Layer your pasta - be careful if you are doing vegan as some lasagne is made with egg.

Making the white sauce:
Gently melt coconut oil in a pan.
Add the flour to make a paste
I then add a dash of rice milk each time it starts to bubble and stir fast. This is always my failsafe way of ensuring no lumps.
Season it because you won't be adding cheese - so herbs and salt and pepper will give a nice herby sauce.
When you have the consistency you want, pour it over the lasagne and bake in the oven for 25 minutes.


Vegan Potato and Mushroom Biryani

Yes, doesn't look much as this was what was left!
You'll need mushrooms, potatoes, onions, garlic, beans, lentils, rice, cumin, tomato paste, coconut milk, garam masala, corriander, veggie stock or bouillon

Fry your onion and garlic
Cut the potatoes into small chunks and add to the pan,
sprinkle your garam masala and your cumin over the veggies in the pan and coat them.
Add the beans and a dessert spoon of bouillon or a veggie stock cube with around 1pt of water.
Stir well. and allow to simmer so things soften.

In another pan boil some rice and lentils together.

In your main pan, add the coconut milk and tomato paste and then your mushrooms.

Once your rice and lentils have boiled you can drain them and add them to your main pot.

Allow to simmer gently for around 5 minutes but be careful, you want the liquid to reduce but you don't want the food to burn. Biryani is a drier curry than something like a korma.

Serve.

It's yummy!
Saturday night's dinner - not vegan, but dairy free none the less.


And finally here's a picture of LMB's new quilt, finally finished!